Orla (stitchlily on Rav) has a blog and has posted a very comprehensive book list that you might find intriguing! She writes:
"Here is a collection of books or articles specifically on Irish Textiles I have come across so far. It includes historical and technical books, journal articles, and anything else I could find!"
She also notes that she (and many other Ravelers) have the Japanese Book, Irish Crochet Lace and they find it quite useful. Pomadour24 is a seller on eBay and Etsy, and she is a great resource for Japanese crochet books.

Tuesday, April 17, 2012

Tutorial--Tension
One of our newer members of the Ravelry Irish Crochet Lovers Group had some tension issues on her first motifs. She is sharing her experience in order to help other beginners. Thanks Christina!
 Christina: I’m very new when it comes to Irish lace so I wanted to make sure my tension is right. Thanks for the help
Kim (frankiedavis)'s reply: I’m thinking you want to be tighter, with a smaller hook, and maybe a not very stretchy thread. usually when I am joining a sc into a previous round, I go through both loops of the stitch. I use the back loop only for rows or places where I want a defining line. But for joining with one stitch, you want a little more strength, and using 2 loops will also prevent that one loop from stretching out. Hope this helps!
 Christina: so I made the suggested changes so does this look right? Or do I need to go down another needle size?
Lori (loriart): It looks really nice to me! You are using hooks not needles? Then you can block them, get them wet, pat them in a towel and lay out flat to dry. You can pin them to a perfect shape then too.

Christina: My first attempt at a shamrock it isn’t beautiful but not awful for my first attempt
Kim: If you make a ring (buttony) and sew it in the center, it would be perfect!
If you need help, just ask on Rav!

Kim (frankiedavis)'s reply: I’m thinking you want to be tighter, with a smaller hook, and maybe a not very stretchy thread. usually when I am joining a sc into a previous round, I go through both loops of the stitch. I use the back loop only for rows or places where I want a defining line. But for joining with one stitch, you want a little more strength, and using 2 loops will also prevent that one loop from stretching out. Hope this helps!
 Christina: so I made the suggested changes so does this look right? Or do I need to go down another needle size?
Lori (loriart): It looks really nice to me! You are using hooks not needles? Then you can block them, get them wet, pat them in a towel and lay out flat to dry. You can pin them to a perfect shape then too.

Christina: My first attempt at a shamrock it isn’t beautiful but not awful for my first attempt
Kim: If you make a ring (buttony) and sew it in the center, it would be perfect!
If you need help, just ask on Rav!
Monday, April 16, 2012
Antique of the Week--Large Edwardian Collar
 This beautiful collar is from Ebay seller adtjmd. The seller has kindly shared these pictures with us! The collar is an "antique hand made Edwardian Irish crochet lace collar in a rich cream... Features an ornate dimensional floral motif showcasing a variety of multi-petaled flowers, some of which are 5-tiered, and finished off with a scalloped edge all around with dimensional florets scattered along the edge of the entire front panel... Spans ~19in wideX20in long, with the front measuring ~16in vertically, neckline measuring ~14in, and finished all around." Double click on pictures to enlarge.
Detail of front flower
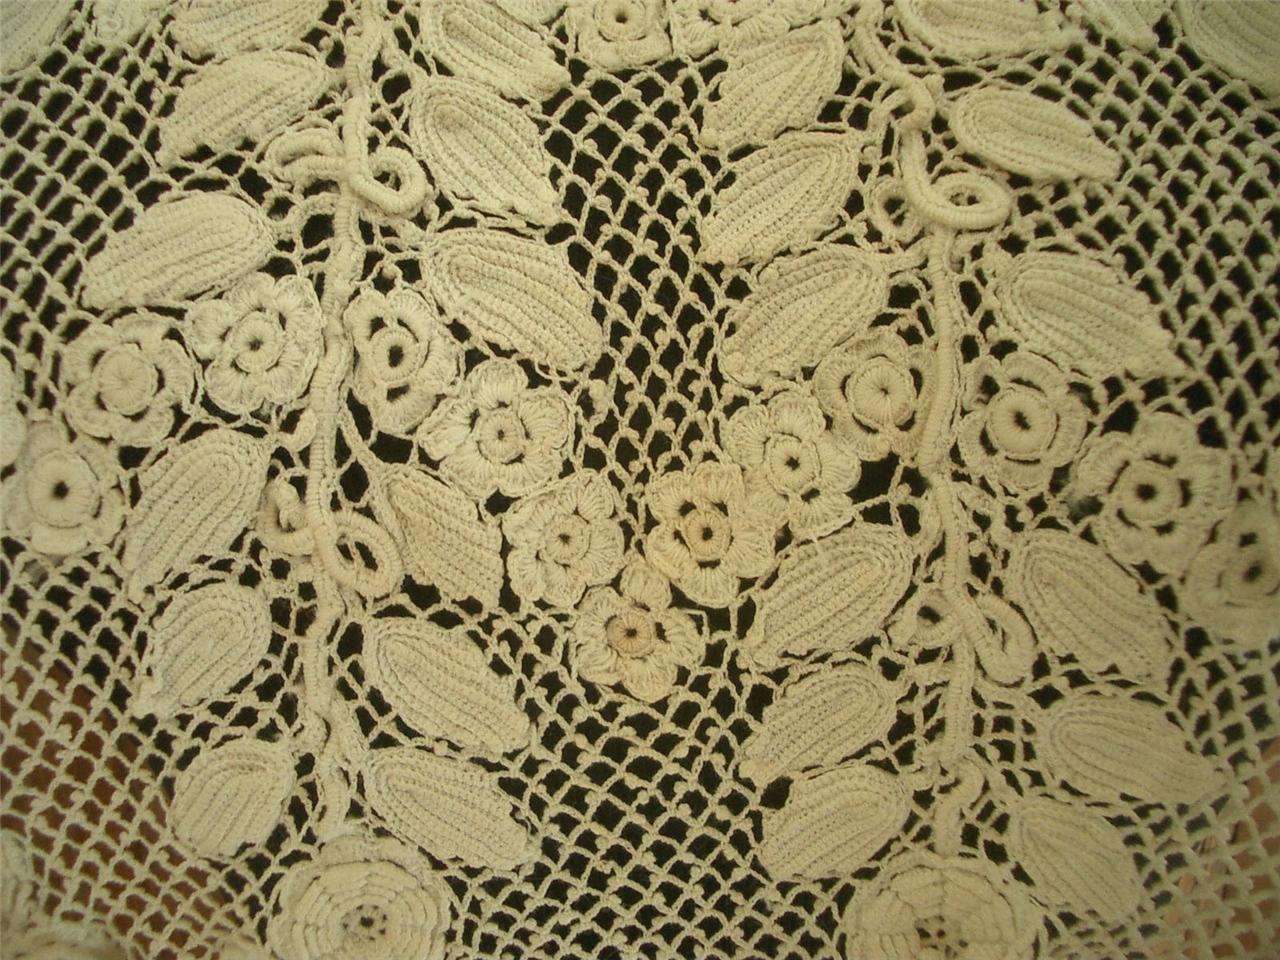
Lower front of collar. Note the added detail of the vine making a figure-eight as it winds down to the large rose.

Neck front

Side view. I love the roses climbing up the side of the neck!

Back--it's as elaborate as the front!

Detail of back
Wednesday, April 11, 2012
Modern Lace-Mountain Gold
In our "Modern Lace" posts, we will feature current trends in Irish crochet, and new or inspired uses for traditional techniques. Our first post is by Fatima L., who has designed the gorgeous necklace below.

“Mountain Gold” is one of five crochet jewelry patterns that I designed to explore the idea of the small crocheted motif and simple hand sewing. The motifs in “Mountain Gold” are sewn together to become an adornment for the neck.
I am quite fond of combining sewing with crocheting, something that I learned through reading antique publications on Irish Crochet. I find that sewn joins have useful rigidity and can be adjusted to desired flatness or curvature of the crocheted fabric. While there are specific sewing techniques for seaming such as whip stitch and mattress stitch, I often improvise, taking into account the direction and tension of sewing and the effect these have on the fabric.
The leaves in “Mountain Gold” are similarly inspired by Irish Crochet motifs, in particular, the leaves employed in Lula M. Harvey’s “Wild Rose Design.”
“Mountain Gold” may be found at http://crochetology.net/2011/04/mountain-gold
The Priscilla Irish Crochet Book, A Collection of New and Original Designs with Stitches and Lessons for Working by Lula M. Harvey, published in 1912.

“Mountain Gold” is one of five crochet jewelry patterns that I designed to explore the idea of the small crocheted motif and simple hand sewing. The motifs in “Mountain Gold” are sewn together to become an adornment for the neck.
I am quite fond of combining sewing with crocheting, something that I learned through reading antique publications on Irish Crochet. I find that sewn joins have useful rigidity and can be adjusted to desired flatness or curvature of the crocheted fabric. While there are specific sewing techniques for seaming such as whip stitch and mattress stitch, I often improvise, taking into account the direction and tension of sewing and the effect these have on the fabric.
The leaves in “Mountain Gold” are similarly inspired by Irish Crochet motifs, in particular, the leaves employed in Lula M. Harvey’s “Wild Rose Design.”
“Mountain Gold” may be found at http://crochetology.net/2011/04/mountain-gold
The Priscilla Irish Crochet Book, A Collection of New and Original Designs with Stitches and Lessons for Working by Lula M. Harvey, published in 1912.
Tuesday, April 10, 2012
Translation-Hardouin Volume 6, Lace with 3 Motifs, Carnation

IC Abbreviations
pc = padding cord (also known as packing cord)
p = picot ( here, 5ch 1dc in same stitch)
pc = padding cord (also known as packing cord)
p = picot ( here, 5ch 1dc in same stitch)
Instructions:
Make 15ch, skip 1st ch, dc in rest (14dc).
Pick up pc, and work round the “baguette” (i. e. bottom section) with 14 dc on each side and 5dc into the lower point, 1dc into the upper point. Make 15ch, skip 1st ch, dc in rest (14dc).
1st Central loop: work 25dc on the pc alone. Pull on the cord to form the central loop (see picture) and join to flower with 1dc in the same stitch at the top end of the baguette, then 1 dc in next 2 stitches.
2nd loop: make 36dc on the pc alone, turn and join with 1st into the 2nd st after the central loop, curving it to look as in picture.
Turn, go back round loop, working in back loop of stitches and making picots:
(6dc, p) x 5, 6dc.
(6dc, p) x 5, 6dc.
Make a 2nd row of dc all round the baguette, still using pc, and with 3dc at the point.
Flower petal 1: make 25dc on pc alone, tighten cord and join with 1 stitch between the first and second picots.
Petals 2, 3, 4: make 21dc on pc alone, tighten cord and join between picots.
Petal 5: make 25dc on pc alone, tighten cord, and join between loop and flower base.
Continue round baguette, in back loop of stitch: (4dc, p) x 3, 4dc.
Stem: 45dc on pc alone, return with dc in back loop of stitch, tighten pc slightly to give a curve to the stem.
Continue round other side of baguette: (4dc, p) x 3, 4dc
Work round the 5 petals:
1st and last petals: 4dc, (p, 5dc) x 4, 4dc
Skip the last stitch of the petal as well as the joining st and the 1st of the next petal, and tighten the pc a little after each petal.
1st and last petals: 4dc, (p, 5dc) x 4, 4dc
Skip the last stitch of the petal as well as the joining st and the 1st of the next petal, and tighten the pc a little after each petal.
Round the 3 other petals work 3dc, (p, 4dc) x 3, p, 3dc
After the 5th petal cut and finish ends.
--by Sally M.
--by Sally M.
Sunday, April 8, 2012
Antique of the Week
Here is another piece shared by Myra W. She purchased these cuffs the same time as the collar from last week.


Remember, if you have any antiques you would like to share, send them to us at irishcrochettogether@gmail.com

This next photo shows how TINY the stitches are! The pin is on one of the shamrock motifs. Thank you Myra for the great pictures!

Remember, if you have any antiques you would like to share, send them to us at irishcrochettogether@gmail.com
Tuesday, April 3, 2012
Lace Comparison
I've noticed that many of our favorite Irish Crochet motifs are echoed in other types of lace. Irish Crochet was offered up as a lower cost alternative to the luxurious, expensive lace made in other parts of Europe. Once you start looking, you see repeated motifs everywhere! I found two pieces of lace that share design elements with one of my favorite Irish Crochet lace braids.


This braid is found in the DMC Irish Crochet Lace book, by Therese Dillmont. It is Plate II, using figures 20, 50 and 75 to make it. If you go to the Antique Pattern Library look down under "D" for the pdfs. This braid is in pdf no. 2. The figures are in pdf no. 1.


The example on the left looks like a tatting piece is crochet, and the one on the right looks to be machine made lace. All three designs share the repeated ring-in-a-circle motif, laid out in a linear fashion.
Subscribe to:
Posts (Atom)